What is Google's Search Console?

Google Search Console is a free service offered by Google that helps you monitor and maintain your site’s presence in Google Search results. You don’t have to sign up for Search Console for your site to be included in Google’s search results, but doing so can help you understand how Google views your site and optimize its performance in search results.
This article is the first in the Search Console Series and following eBook. This is how we use the Search Console, My Business, and Analytics here at Storm Stanley to measure our own successes and to see where we may be coming up short.
Google Search Console, formerly “Google Webmaster Tools (GWT),” is front in center in measuring how your website is doing.
This is what Google says Search Console is used for:
“Monitor your site’s performance in Google Search results:
- Make sure that Google can access your content
- Submit new content for crawling and remove content you don’t want shown in search results
- Create and monitor content that delivers visually engaging search results
- Maintain your site with minimal disruption to search performance
- Monitor and resolve malware or spam issues so your site stays clean
-
Discover how Google Search—and the world—sees your site:
- Which queries caused your site to appear in search results?
- Did some queries result in more traffic to your site than others?
- Are your product prices, company contact info, or events highlighted in rich search results?
- Which sites are linking to your website?
- Is your mobile site performing well for visitors searching on mobile?”
-
If some of this looks foreign to you, don’t worry, we will explain it. I just wanted you to see how Google views the importance of their Search Console tool.
This first piece is all about how to get you started in creating your own Search Console. I know this looks intimidating with all the various schemas and links into Google Developer’s Tools, API’s, and Analytics.
Do not let this intimidate you! If you read our 2 part Google Analytics: The Basics eBook and blogs, then you know that we will cut through all the unnecessarily confusing stuff and get into what your site needs to be on Search Console. Yes, there is a huge difference between Google Analytics and Google Search Console and I cannot stress enough that these are separate tools. If you can compartmentalize this, your half way there already.
Each tool Google uses is a little different from the last and require different considerations and optimizing.
Getting Your Site on the Search Console Step 1
In your address bar of your favorite browser, type https://www.google.com/webmasters/ or simply Google search “Search Console.”
You will see something similar to this:
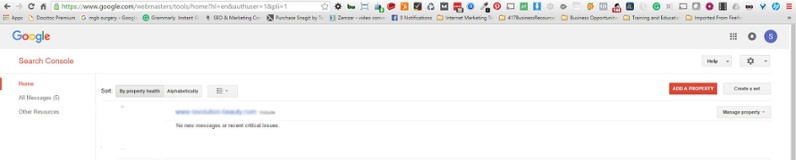
You will not have any properties the first time you login to the Search Console. That’s ok, but it should look similar to this.
One thing to keep in mind is the Search Console is based on “Properties” and “Property Sets.” The main purpose for this is to create sets of and then see all the Search Analytics data for that one set in one single report.
The following next few paragraphs are somewhat on the techy side, but it helps you understand the overall objective Google is trying to achieve. I apologize ahead of time.
Google Search Console has always reported Search Analytics data such as impressions, clicks and Click Through Rates (CTR) on a property-by-property basis. Each property has to be added individually such as, the HTTP vs. HTTPS version of your site or the WWW vs. the non-WWW version, and even your apps so there was no quick way to get a snapshot of the whole site in one report.
With Google Search Console Sets, you can now create sets and then see all the Search Analytics data for that one set in one single report. Now, you combine multiple properties (both apps and sites) into a single group to monitor the overall clicks and impressions in search within a single report.
What does this mean to you?
It means, for most of us, that you will create one property for the www.yoursite.com and a separate property for yoursite.com. Google treats them as separate sites. If you have any subdomains, such as info.yoursite.com, you will need to add that as a property as well.
The good news is when verifying these properties, you will only need to choose how to complete this once, the other properties will read it the same way.
If you got through that, your ahead already. Every so often, we have to go through some of this techy stuff. We will be going deeper in the next blog, “Using Search Console: Beyond the Analytics.” Much like the analytics blog, we will be going into how to use the data you set up today to measure how your site is performing.
You can add up to 1,000 properties to your account, including both websites and mobile apps. Follow these steps to start using Search Console for your website:
Add your site to Search Console.
As stated above, be sure to add all variations of your site root URL, including www and non-www versions, and all subdomain variations (yoursite.com, m.yoursite.com, info.yoursite.com). For this guide, we will focus on adding website properties, we will do applications in a later guide.
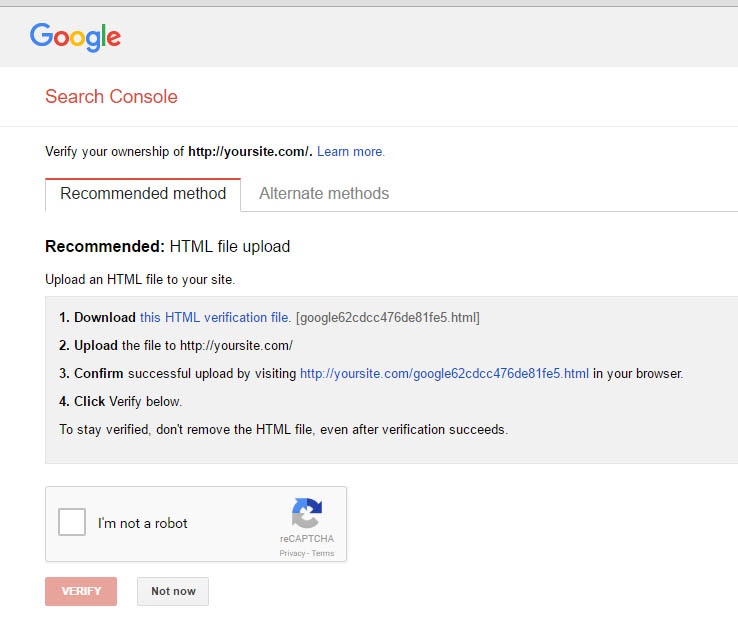
Verify your site.
Verification proves that you are the owner of the website. Until you are verified for a website you cannot access any Search Console data for it.
Google Note: “Google-hosted sites (such as Blogger or Sites pages) are automatically verified. Verification doesn’t affect PageRank or affect your site’s performance in Google’s search results.”
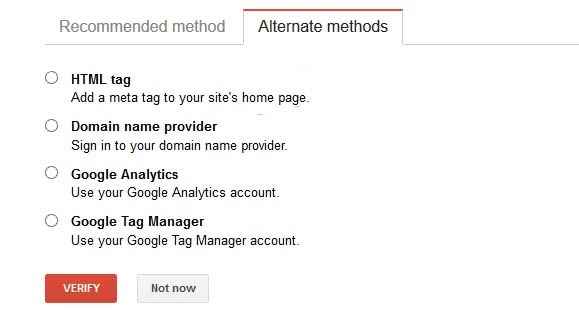
Adding an HTML tag
This verification method is recommended by Google, but keep in mind, this is best for users and site owners who have experience working with HTML code.
From the Search Console dashboard, select “Manage Property,” then “Verify this property.” If the “HTML Tag” option does not appear under “Recommended method,” then you should click on the “Alternate methods” tab and select “HTML tag.” This will provide you with the HTML code you’ll need for verification.
Copy the code and use your HTML editor to open the code for your site’s homepage. Paste the code provided within in the <Head> section of the HTML code. If your site already has a meta tag or other code in the <Head> section, it doesn’t matter where the verification code is placed in relation to the other code; it simply needs to be in the <Head> section. If your site doesn’t have a <Head> section, you can create one for the sake of verifying the site.
Once the verification code has been added, save and publish the updated code, and open your site’s homepage. From there, view the site’s source code. The verification code should be visible in the <Head> section.
Once you’re sure the code is added to your site’s homepage, go back to Search Console and click “Verify.” Google will then check your site’s code for the verification code. If the code is found, you will see a screen letting you know the site has been verified. If not, you will be provided with information about the errors it encountered.
When your site has been verified by Search Console, do not remove the verification code from your site. If the code is removed, it will cause your site to become unverified.
Uploading an HTML file
To use this method, you must be able to upload files to a site’s root directory.
From the Search Console dashboard, select “Manage site,” then “Verify this site.” If “HTML file upload” is not listed under “Recommended method,” it should be listed under the “Alternate method” tab.

When you select this method, you will be asked to download an HTML file. Download it, then upload it to the specified location. Do not make any changes to the content of the file or the filename; the file needs to be kept exactly the same. If it is changed, Search Console will not be able to verify the site.
After the HTML file has been uploaded, go back to Search Console and click “Verify.” If everything has been uploaded correctly, you will see a page letting you know the site has been verified.
Once you have verified your site using this method, do not delete the HTML file from your site. This will cause your site to become unverified.
Verifying via domain name provider
The domain name provider is the company you purchased a domain from or where your website is hosted. When you verify using your domain name provider, it not only proves you’re the owner of the main domain, but that you also own all of the subdomains and subdirectories associated with it. This is an excellent option if you have a large website.
From the Search Console dashboard, select “Manage site,” then “Verify this site.” If you don’t see the “Domain name provider” option listed under “Recommended method,” look under the “Alternate method” tab.
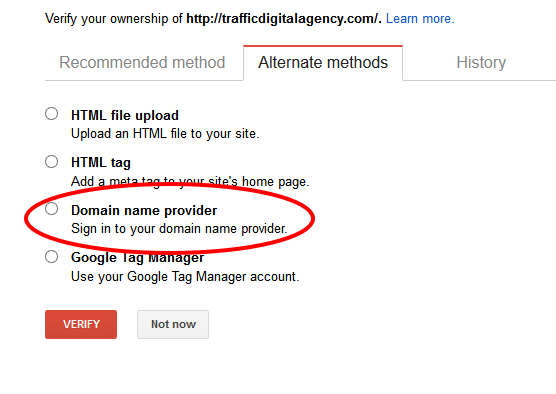
When you select “Domain name provider,” you will be asked to choose your domain name provider from a list of commonly used providers, such as GoDaddy.com. If your provider is not on this list, choose “Other” and you will be given instructions on how to create a DNS TXT record for your provider. If a DNS TXT record doesn’t work for your provider, you will have the option of creating a CNAME record instead.
Adding Google Analytics code
If you already use Google Analytics (GA) to monitor your site’s traffic, this could be the easiest option for you. But first, you’ll need to be able to check the site’s HTML code to make sure the GA tracking code is placed within the <Head> section of your homepage’s code, not in the <Body> section. If the GA code is not already in the <Head> section, you’ll need to move it there for this method to work.
From the Search Console dashboard, select “Manage site,” then “Verify this site.” If you don’t see the “Google Analytics tracking code” option under the “Recommended method,” look under the “Alternate method” tab. When you select “Google Analytics tracking method,” you’ll be provided with a series of instructions to follow.

Once your site has been verified, do not remove the GA code from your site, or it will cause your site to become unverified.
Using Google Tag Manager
If you already use Google Tag Manager (GTM) for your site, this might be the easiest way to verify your site. If you’re going to try this method, you need to have “View, Edit, and Manage” permissions enabled for your account in GTM. Before trying this method, look at your site’s HTML code to make sure the GTM code is placed immediately after your site’s <Body> tag.
From the Search Console dashboard, select “Manage site,” then “Verify this site.” If you don’t see the “Google Tag Manager” option listed under “Recommended method,” it should appear under “Alternate method.”
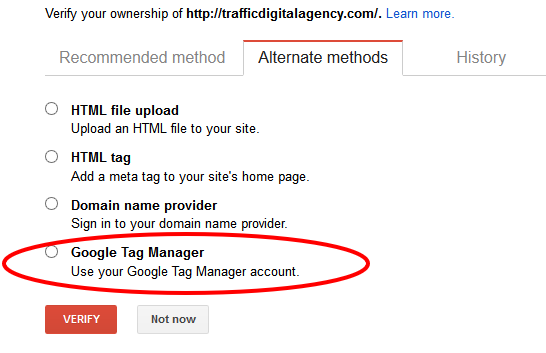
Select “Google Tag Manager” and click “Verify.” If the Google Tag Manager code is found, you should see a screen letting you know your site has been verified.
Once your site is verified, do not remove the GTM code from your site, or your site will become unverified.
Choose how you prefer Google to view your site.
With or without the www.
Specify the www or non-www version of your site as canonical. This applies only to sites that host pages in both www and non-www domains (www.yoursite.com and yoursite.com).
Add or remove users who can see your data.
Add owners and users who can read Search Console data for your site or change Google Search site settings. This can be anyone with a Gmail account or uses Google Apps.
Let Google know if you want to target specific countries with your site, or any section of your site.
Read and understand Google’s webmaster guidelines. Be sure that you are following best practices to enable Google to crawl (find) and index (understand) your pages and rank them appropriately, and that you do not violate any of Google’s quality guidelines.
Sitemaps are critical for Google to find and index your site. Google does crawl automatically, but it takes a while. To help Google along, we suggest you submit a sitemap and a robots.txt file to help Google understand which pages we should and should not crawl on your site.
That’s it, you’re now a part of Google’s Search Console. In part 2, we will break down how to use Search Console to ensure Google has the appropriate information about your website and stays up to date with changes to your site. For example, we will show you how to use the robot.txt tester and submitting a sitemap.
Part 3, “Advanced Search Console Strategies” will show you how to use the Search Console to make sure your site is error free and how to use that information to maximize your websites effectiveness. We will also introduce applications to the Search Console.
Get started today!
Schedule your Intro Call with our team.