6 Steps To Taking Better Brand Images Yourself

A photo is worth a thousand words.
It's true. One great photo of your product or your business can show your customers what it would take a thousand words to describe. And one bad photo can provoke negative feelings that can take a thousand words to correct.
People put a lot of stock into presentation, whether consciously or not. You may have a brand new beautiful facility or a sleek and modern product, but people assume that the images they see on websites and social channels are accurate. If your photos are flat, poorly lit, out of focus, or just plain bad, potential customers will be less interested. Inversely, a good image can make an average facility or product much more appealing to those potential customers.
Some companies have a photographer on staff while others pay an agency to take professional quality photos for them, but are those your only options? While you will always get higher quality images from a professional photographer with professional grade equipment, it is possible to take quality images yourself with nothing more than a good smart phone and this list of rules:
1: Get it in Focus
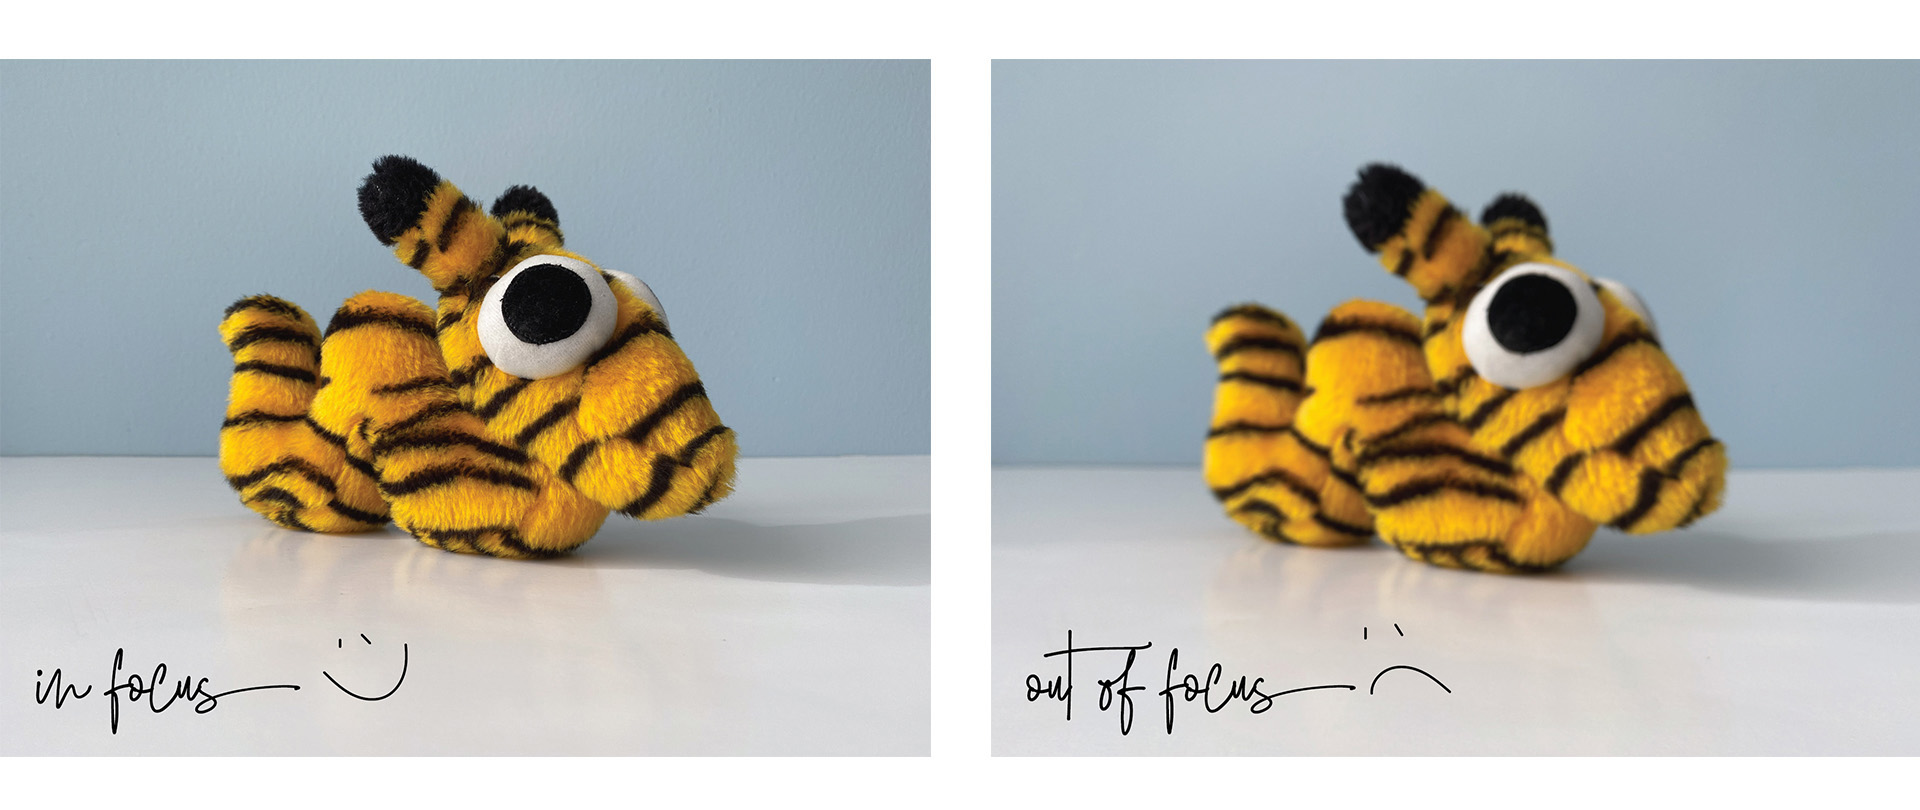
This one may seem like a no-brainer, but you might be surprised how often out-of-focus images are used. If your image is not in focus, no one can tell what it is, so make sure every image you choose to use is clear. A few things that might cause your image to be out of focus are:
- movement (are you shaking while trying to take your photo?)
- you're too close to your subject
- you're not telling your camera where to focus

Stand far enough away from your subject that your camera is able to focus (many smartphones will tell you to move back if you are too close) tap the screen on your subject or select your focus point and verify that the camera has locked on. Hold steady while you take the photo. It may be helpful to brace yourself against a wall or table, or kneel and brace your elbows on your knees or on the ground.
If you're shooting with a camera (instead of a phone) Make sure that your shutter speed is fast enough that you can shoot hand-held. Some modes will automatically set your shutter speed for you (night mode on a smart phone will cause this problem as well). A good rule to follow is that if you are shooting hand-held, your shutter speed should be at least 1/100ths of a second to avoid catching movement. You may need to adjust your settings to achieve this, or use a tripod.
2: Find Good Light
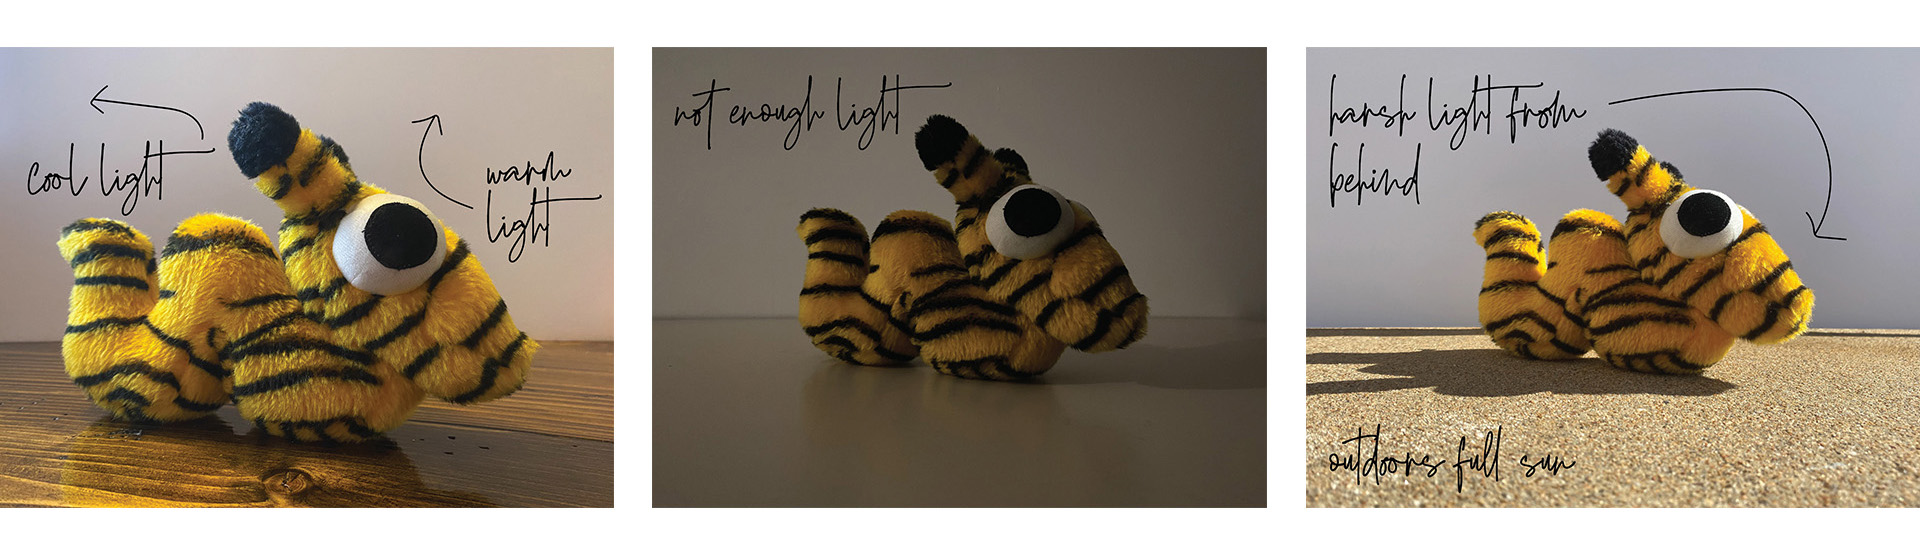
Lighting is the key to photography. After all, that's essentially what photography is— the recording of light. Not only will good lighting make it easier to see the details of your image, but it will also help you avoid other potential problems you might have with getting a good image (for example, low light can make it hard for your camera to find focus, and can cause your shutter speed to be too slow, resulting in a blurry image).
What qualifies at "good" light? Basically you want enough light to sufficiently illuminate your subject while not so much light that there are extremely bright "blown out" highlights and very dark shadows. You also want the color of the light to be even. Tungsten bulbs give off a very warm yellow light, while fluorescents produce a cooler blue light. The sun can vary from warm to cool based on the time of day and if it's cloudy or not. If part of your image is lit with a warm light and the other with a cool light, you may notice that your image does not accurately reflect the true color of your subject. A few tips for finding soft, even lighting are:If shooting outdoors
- Shoot in a shaded area
- Shoot when the sun is behind a cloud
- Shoot when the sun is low in the sky (early morning or late evening)
If shooting indoors
- Shoot near a large window
- Use a white surface to reflect light back onto your subject (white walls or white poster board) this can be helpful for adding more light or for softening harsh light
- If using artificial light, use all the same kinds of light (all tungsten, all florescent, all LED etc)

The number, direction and intensity of light is also important. As a general rule, you want the most light coming in toward the front of your subject, from a slight left or right angle (not from directly behind your camera) and a slightly lesser light behind your subject to separate it from the background. Depending on the brightness of your main lights, you might also choose to light your background (if you're shooting for a white background, you will want LOTS of light hitting your white background). There are many different ways to achieve this, and no one way that is the right way every time.
3: Crop it Right (Image Composition)
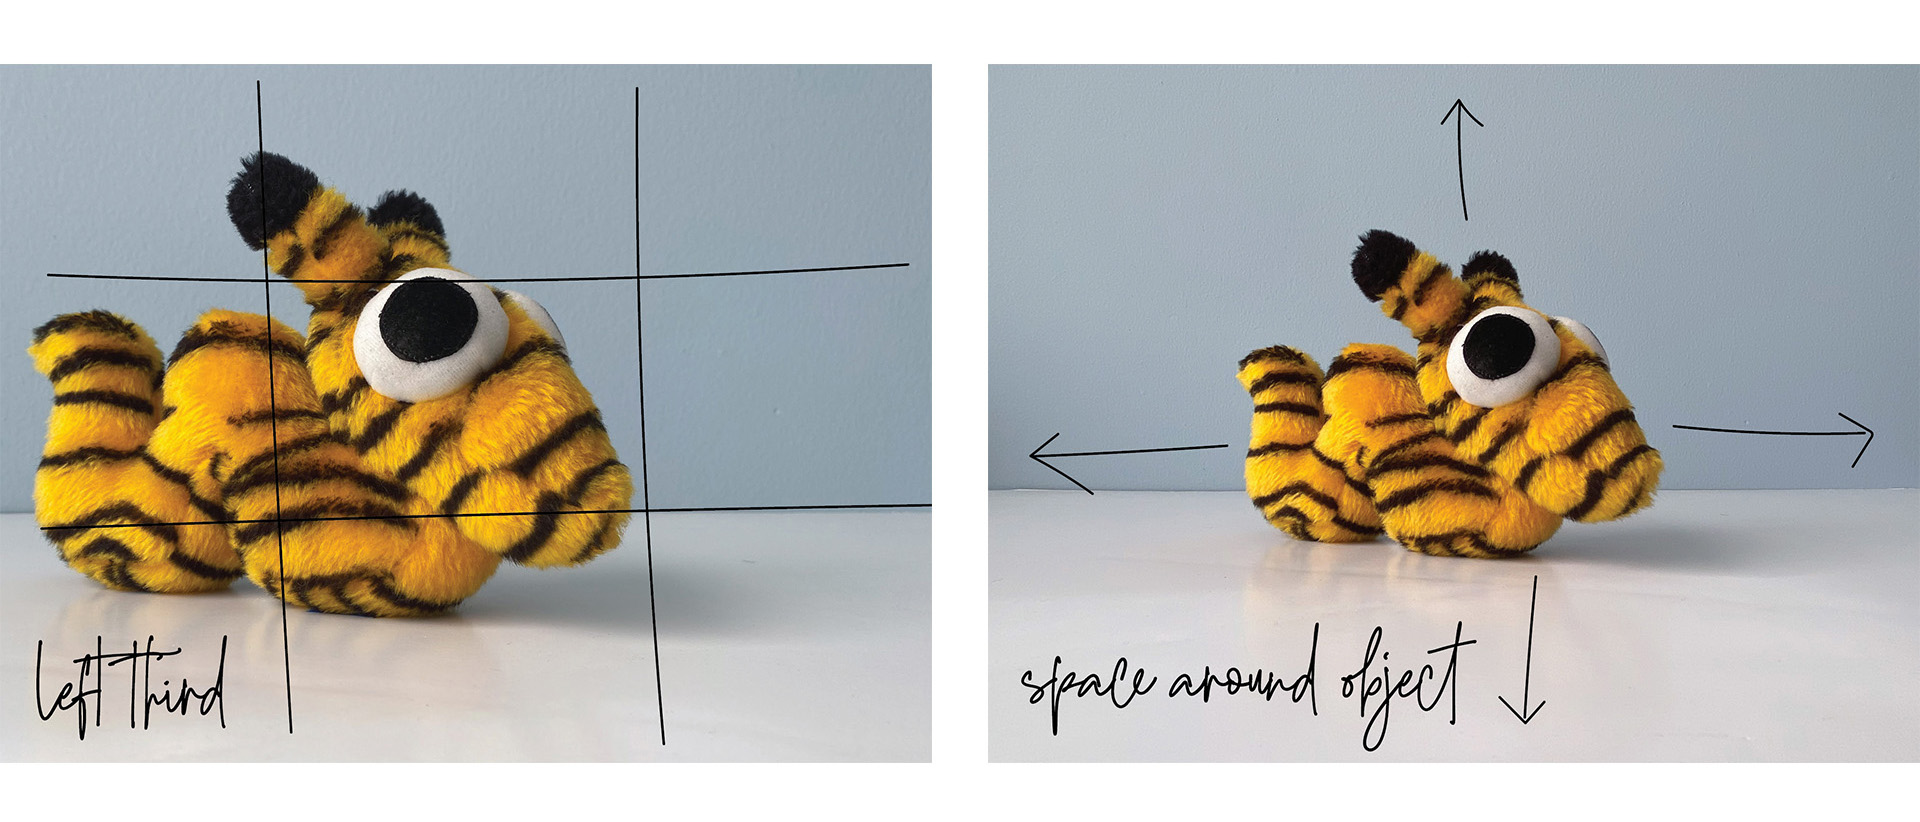
Many think that putting their subject right smack dab in the middle of the image and cropping out as much of the background as possible is the only way to go. While that is one way to do it, there are several other ways to compose (or crop) an image that might make it more interesting and draw more attention from viewers. Consider these points then next time you crop:
- Some background can add context and interest to your image. Additionally, space between your subject and the edge of your image can soften the image and make it more pleasant to look at.
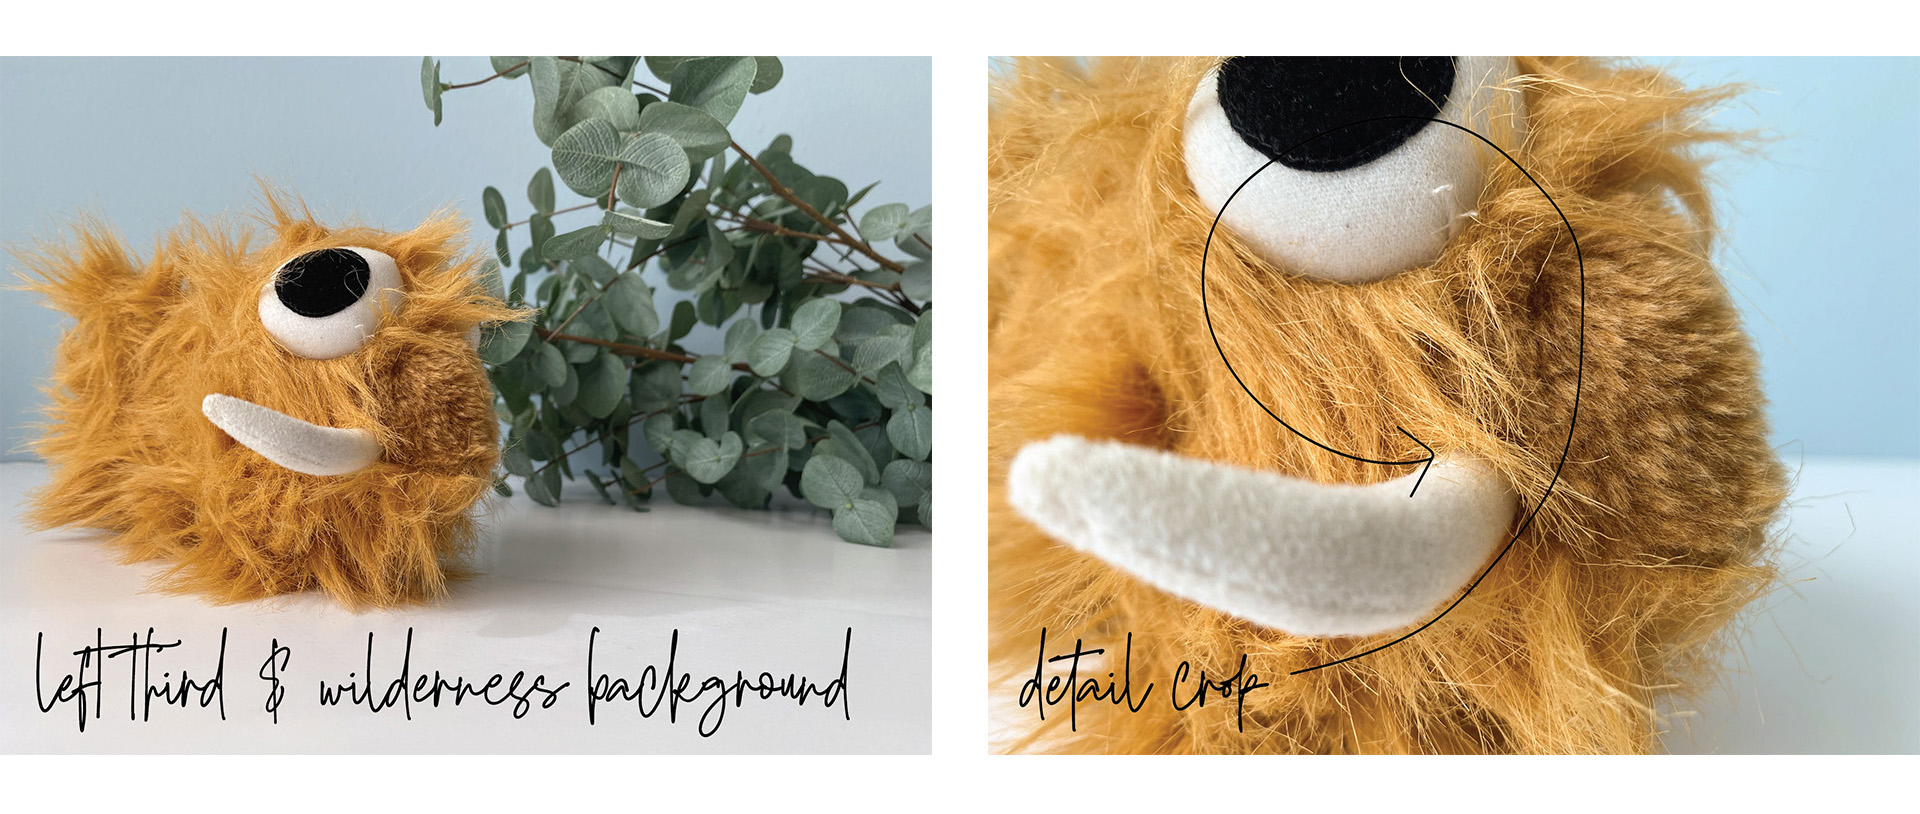
- Placing your subject off-center can add more interest to your image. One basic compositional guide, called the rule of thirds, suggests dividing your subject into thirds both vertically and horizontally, creating 9 spaces, and placing your focal point at one of the corners of the center section.
- Don't put yourself in a box. If you're showcasing t-shirts, there is no rule that says you can't crop out half of your model's face. If you're showcasing a guitar, try taking photos up close and cropping in tight to show off the details.
4: Stage Your Shot
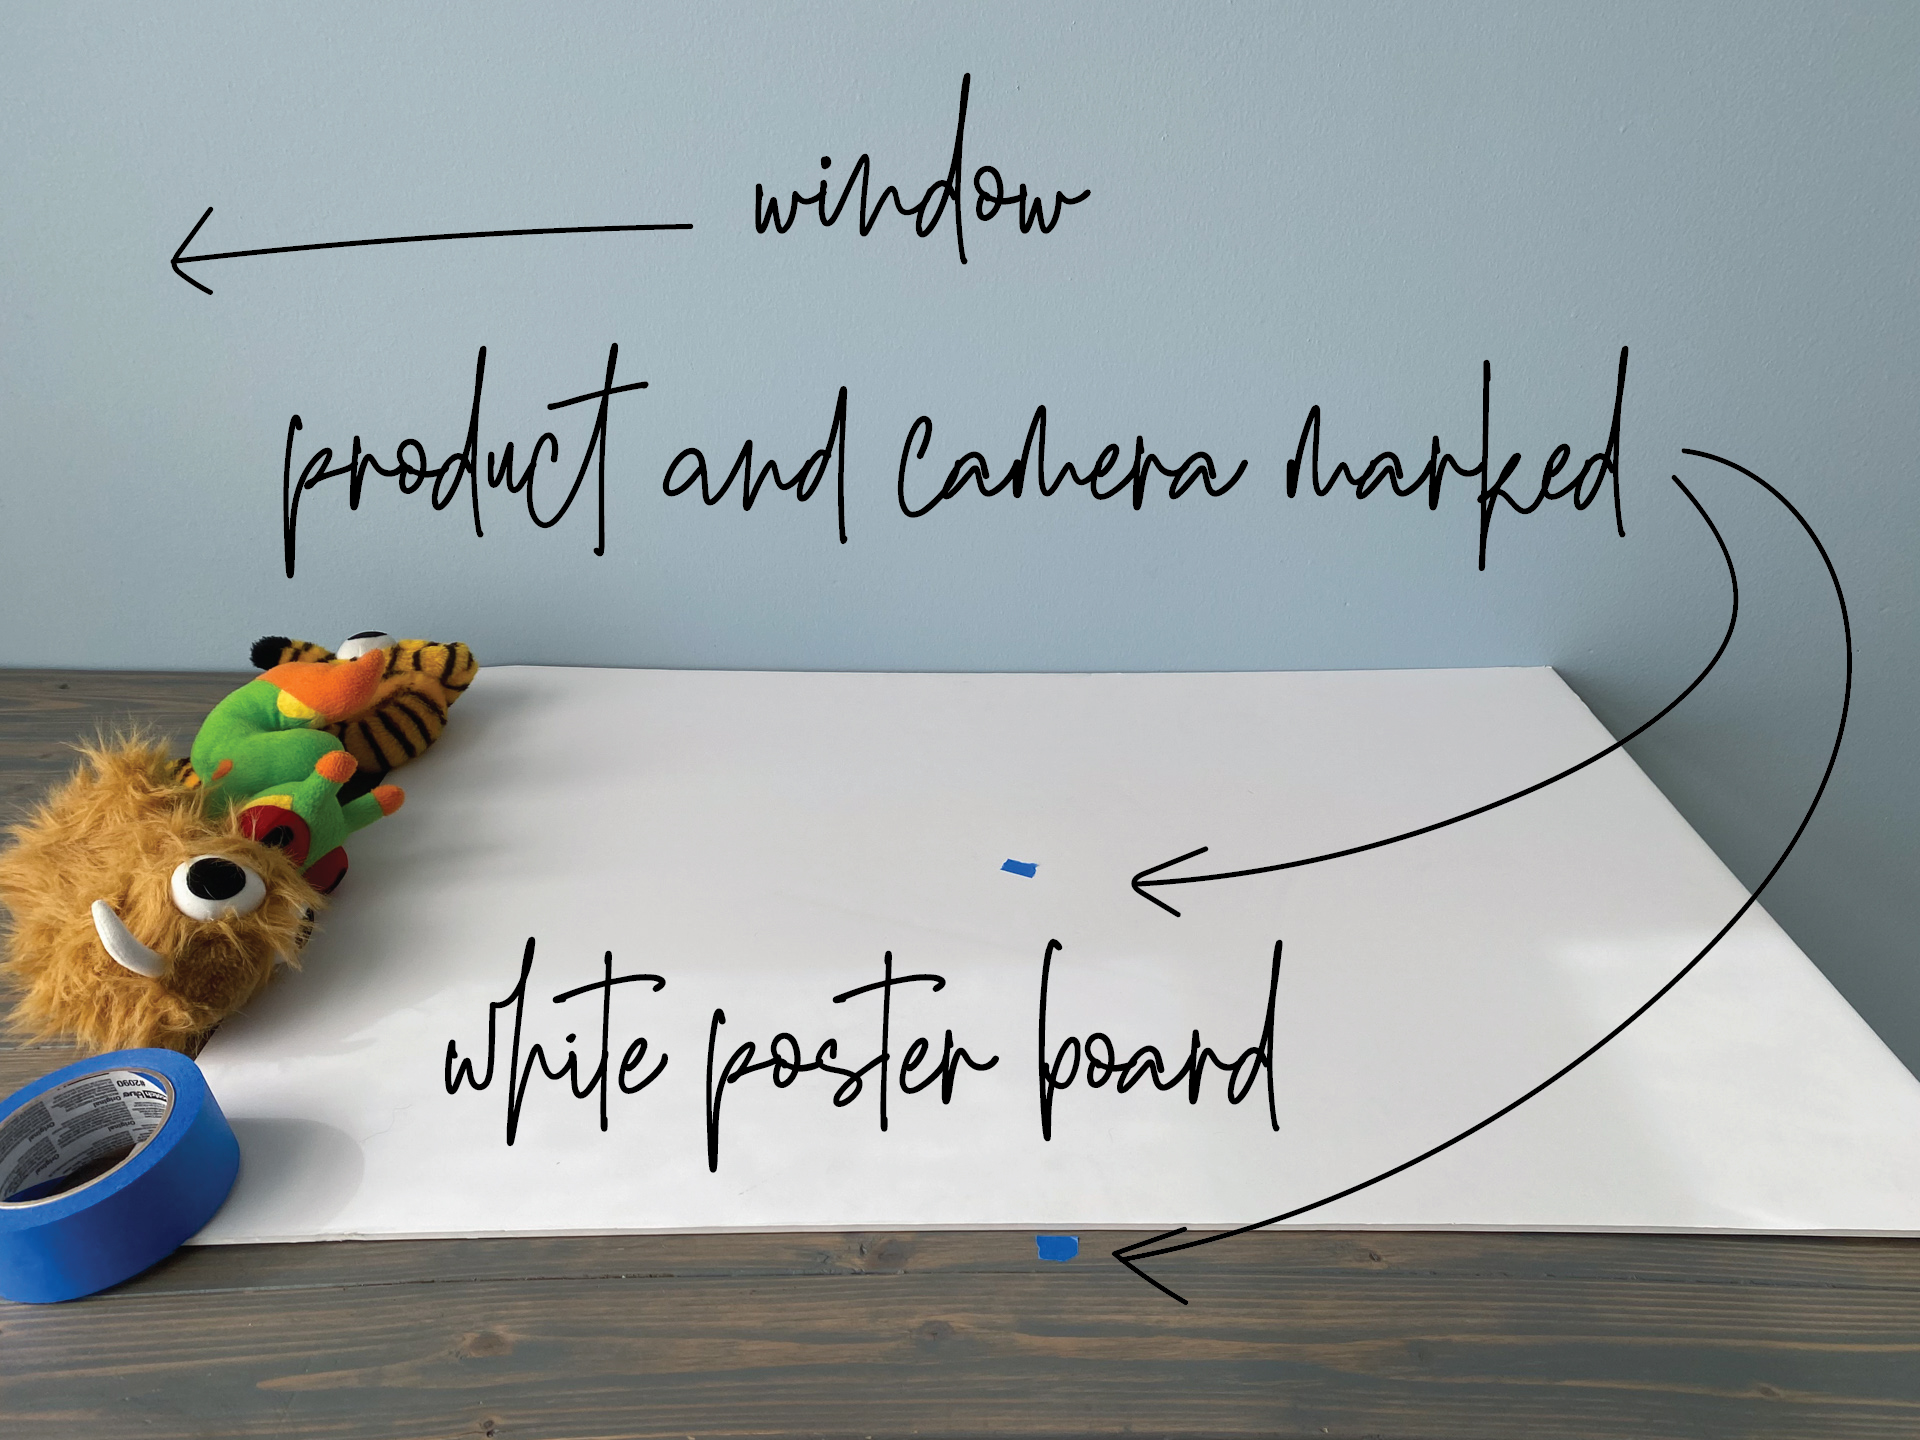
The setup of your shot is important— don't just rush through it. Make a plan and prepare your shot before you press the button. Examine your area and make sure it's clean of dirt, debris and anything that might distract from the focal point of your image.
If you're shooting product images, set up your product, make sure it's clean of dust and fingerprints and mark where it sets so you can set the others in the same place and at the same angle. Decide where you will shoot your photo from and examine the angle, then mark your spot so you shoot from the same place every time.
If you're shooting a facility or candids of your or office, plan your shoot day ahead of time, and let everyone know to dress professionally and to clean up their areas. Are your windows washed and your hedges trimmed? Also consider what might be the best time of day to shoot. Does the sun shine in your windows in the morning or illuminate your main marquee in the evening?
5: Edit
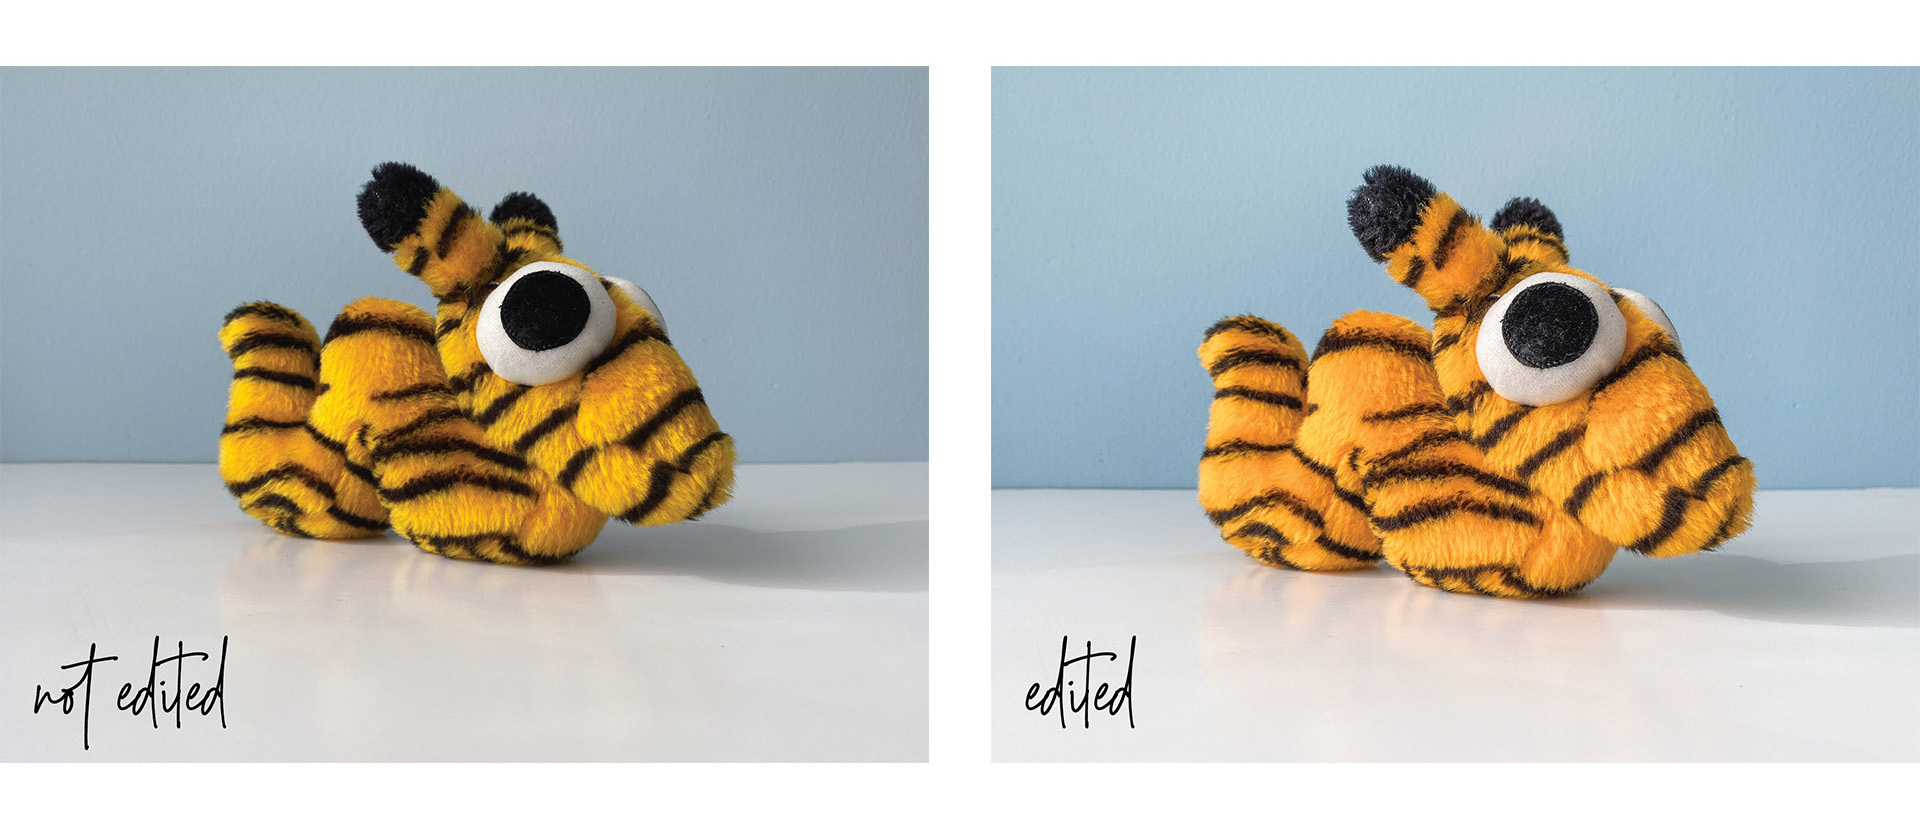
It would be awesome if photos always looked their best exactly as they are shot, but in reality, they don't. Simple edits can make a world of difference, taking your "eh" image to "wow" (but over editing can make it "yuck"). However, since there is no standard set of edits that will work across the board for every image, you will need to develop at least a small understanding of how photo editing works.
When it comes to programs, you have some options. Most professionals use Adobe Photoshop or Adobe Lightroom (likely both), but both cost a monthly subscription fee and offer incredibly in-depth options that many non-photographers will have no interest in (although they both offer a 1-month free trial if you want to try them out). Today, smartphones and tablets often have their own built-in editing programs that can handle the most basic edits. There are also a plethora of apps available that can help you go a bit further with your new-found skill, both for free and for a minimal cost. Regardless of which program or app you use, some of the basic adjustments you'll want to understand are:
- Exposure is the amount of light in your image. Adjusting exposure will make all tones in your overall image lighter or darker.
- Brilliance makes an image look richer and more vibrant, making darker areas brighter and the brightest areas darker. A little goes a long way.
- Highlights adjusts the brightness of the lightest parts of your image.
- Shadows adjusts the brightness of the darkest parts of your image.
- Contrast adjusts the difference between the lightest and darkest parts of your image giving you a wider or narrower range of lights to darks.
- Brightness is similar to exposure in that is effects the lightness or darkness of your image. However, adjusting brightness only affects the middle tones of your image, leaving the lightest and the darkest points the same.
- Black Point is the point at which your darkest parts become completely black without any visible detail.
- Saturation is the intensity of the color.
- Vibrance is similar to saturation in that it adjusts the intensity of color, however, unlike saturation which adjusts all color, vibrance adjusts only the less dominant colors in the image.
- Warmth (Temperature) adjusts the overall color cast of your image from blue to yellow or cool to warm.
- Tint adjusts the overall color cast of your image from green to magenta.
- Sharpness actually refers to haw clear the detail is in your image, and is actually completely dependent on how the image is shot, so when you adjust the sharpness during editing it is really NOT making your image sharper, just helping to define the edges within your image.
- Definition helps to reduce "haze" in an image.
- Noise Reduction helps to reduce static in your image. When you brighten your shadows too much (or, with DSLR cameras, shoot at a high ISO) you can shoot in a darker environment, but you sacrifice some image quality and end up with some static in your image, called noise. This can be reduced in the editing process, but often at the cost of some of your sharpness.
- Vignette, pronounced /vinˈyet/, actually means border. In photography, it refers to the darkening of the outside edges of an image. It can happen naturally with the use of certain photography equipment, or added during editing, and can help direct the viewers attention to the center of the image.

There are also an unlimited number of filters and effects you can download and apply to your images with the touch of a button. These however, are often dramatic and can make an image, especially a product image, look overdone.
A good thing to keep in mind when editing is that you want to try to enhance your image without overdoing it. Start with increasing the exposure just a bit, bringing your shadows up and your highlights down just a few notches, increasing saturation OR vibrance just a little, increasing sharpness a tad, and then adjusting your warmth and tint to ensure that what was white in real life is white in your image.
6: Be Consistent

It's important, especially if you're producing images for your brand, to have a consistent look to all of your images. They don't all have to be shot and edited in the exact same way, but they should have a similar feel. For example, all of your product images should be shot in the same place or a similar place, like against your light blue wall or on your concrete floor and edited to have a light and airy feel. Some brands prefer a darker look to their images, some prefer a high-def feel while others like a vintage feel. Regardless of what your preference is, make sure it matches your brand and that you stay consistent.
Now that you're armed with these few tidbits of photo knowledge, you're ready to confidently start producing images that properly represent your brand. The only thing left for you to do is practice. Go out and start shooting. Don't be afraid to experiment with different locations and different lighting situations. Try some different angles and different editing styles and decide what you like and what you don't; what matches your brand and what doesn't. And, of course, if you just can't seem to get it right, we're here to help!
*All above photos were taken with the iPhone 11 Pro and edited in Lightroom.
Get started today!
Schedule your Intro Call with our team.


